Maricopa sun is no joke. By 2 p.m., the patio can feel like a skillet, and then—because Arizona likes drama—monsoon winds can shove through like a freight train. A durable patio cover isn’t just “nice to have” here; it’s the difference between hiding indoors and actually living outside. If you’re the hands-on type, you can build a cover that shrugs off UV, laughs at gusts, and still looks clean with your stucco and gravel. You know what? With a plan and the right hardware, this is absolutely a weekend-warrior project.
First things first: permits, HOAs, and a smart sketch
Here’s the thing: a solid plan saves you from headaches later. In many Maricopa County cities (Phoenix, Mesa, Chandler, Gilbert, Scottsdale, and friends), a permit is required for attached covers and for freestanding structures over a certain size. Rules vary, so check your city’s portal. If you’ve got an HOA, send them a simple sketch with dimensions, Materials, and color. It’s faster than going back and forth after you’ve bought lumber.
Call 811 (Arizona Blue Stake) a few days before you dig. Gas and irrigation lines play hide-and-seek—you don’t want to meet either with a post-hole digger.
Now orientation. West-facing yards roast in late afternoon. Rotate your rafters so purlins run east–west if you’re using a slatted top; that throws better shade for those brutal hours. If you plan solid roofing like polycarbonate, aim for at least 1:12 pitch so rain and dust wash off. Set beam height to clear doors and windows, and keep grills under the open edge with safe clearance (check your grill manual and local code).
Materials that handle the Valley’s mood swings
Arizona sun eats finishes. Monsoon gusts test connections. Choose materials that hold up without babying.
- Posts: 6×6 Doug fir or cedar, mounted on metal post bases (Simpson Strong-Tie ABA66Z or PBS66). Don’t bury wood—termites love that.
- Beams and rafters: #2 Doug fir or better. Double 2×8 beams, 2×6 rafters are a solid combo for a 10×12 cover.
- Roofing: For shade with rain protection, use twinwall polycarbonate (Suntuf, Palram). It’s light, UV-stable, and cooler underfoot than metal. For open shade, use 2×2 or 1×3 purlins or high-density shade cloth (Coolaroo).
- Fasteners: Hot-dip galvanized or stainless. Structural screws like GRK RSS or Simpson SDWS beat lag bolts for ease and strength.
- Concrete anchors: 1/2-inch wedge anchors (Red Head) for post bases; 5/8-inch for heavy uplift zones.
- Coatings: Exterior paint or solid-color stain with UV blockers. Light Colors stay cooler.
Pro tip: Metal roofing is strong but can turn your cover into a drum during a microburst. Polycarbonate with foam closures and washered screws tends to be quieter.
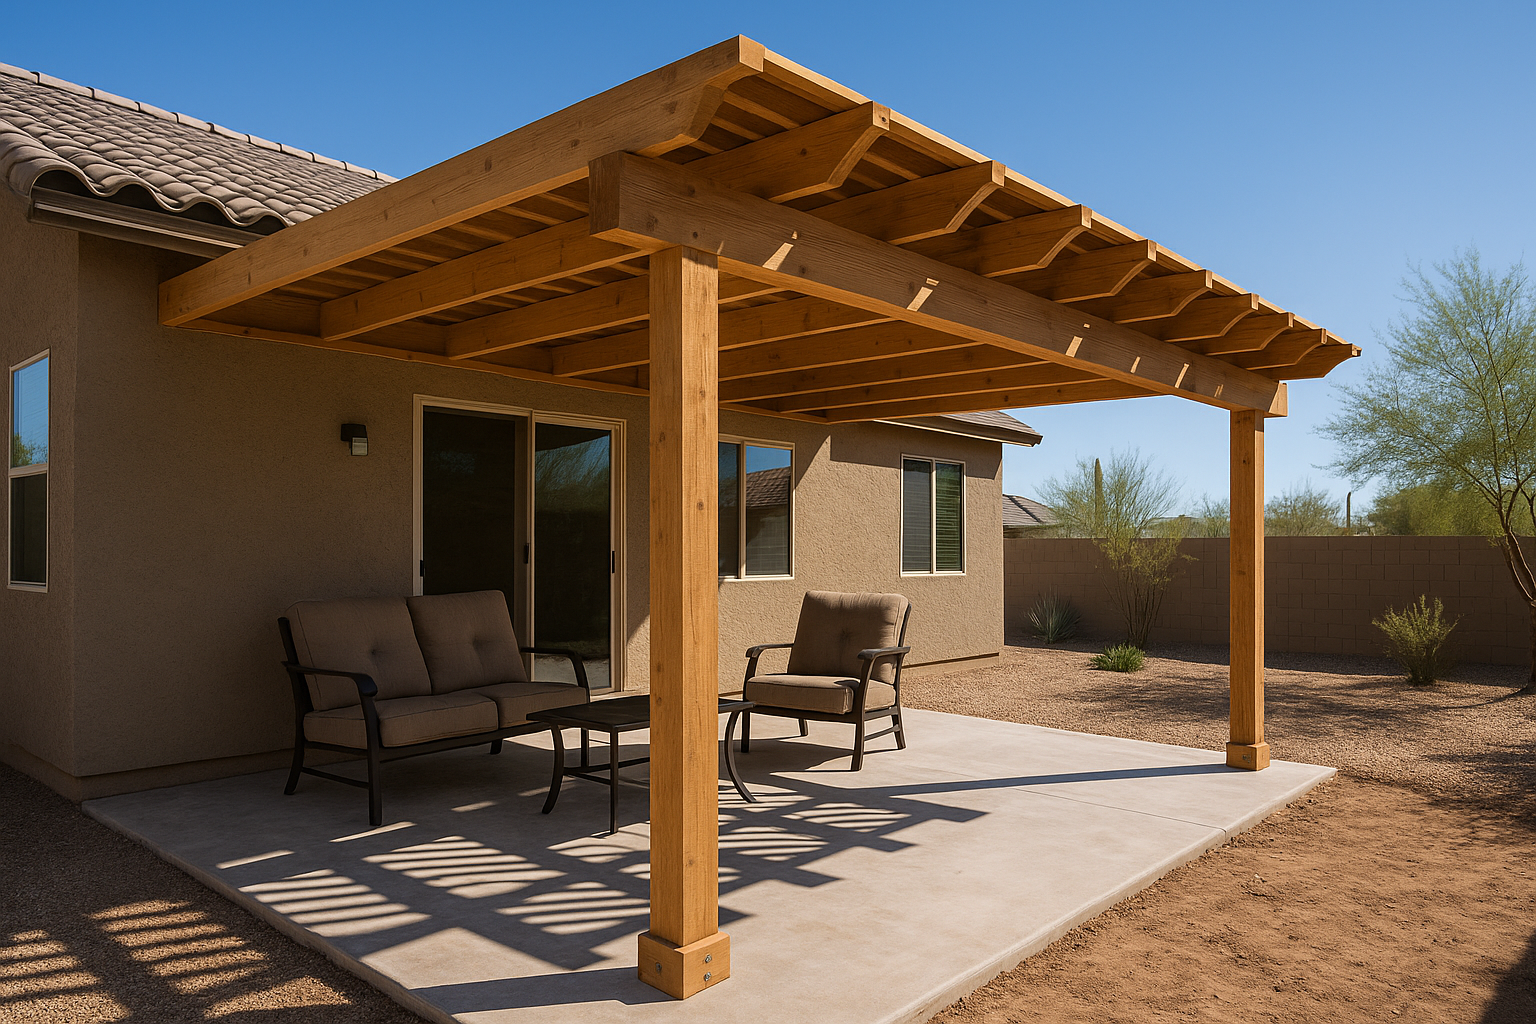
Design that looks simple—and stands strong
Attached covers are popular, but stucco homes get tricky. Flashing a ledger into stucco without leaks is a surgical task. If you’re unsure, build freestanding. It’s clean, code-friendly, and avoids the “surprise drip” months later.
A steady 10×12 freestanding layout is four 6×6 posts, a pair of doubled 2×8 beams, and 2×6 rafters at 16 inches on center. Add 2×2 purlins for filtered shade or lay polycarbonate panels on purlins for rain cover. Keep total height around 8–9 feet for cozy shade and less wind load. Leave a small overhang (6–12 inches) for a finished look.
Wind is the silent critic. Use metal connectors everywhere—post bases, beam seats, rafter ties, and corner braces. Think of it like seatbelts for lumber. Boring? Maybe. Effective? Absolutely.
Build it: clear steps from dirt to shade
1) Layout that’s actually square
Mark a 10×12 rectangle with stakes and string. Use the 3-4-5 rule or measure diagonals until they match. Take your time here; straight lines make everything else feel pro.
2) Footings that stay put
For freestanding, dig four holes 18–24 inches deep (check your city; some ask for 30 inches). Go 16–18 inches wide. Pour concrete piers with a centered 1/2-inch anchor bolt set in each. Let them stand an inch above grade so water never meets wood. In hot weather, concrete sets fast; cover with plastic if it’s windy or dusty.
3) Plumb posts and find your slope
Attach post bases to the bolts, then set 6×6 posts. Plumb them with a level and temporary bracing. Trim tops so the beam line drops about 1/4 inch per foot if you’re adding solid roofing. That’s roughly a 3-inch drop across 12 feet—gentle, but it drains.
4) Beams that don’t sag
Build your doubled 2×8 beams on sawhorses with construction adhesive and structural screws. Lift them onto post caps (Simpson BC or AC series). Through-bolt or use SDWS screws per spec. Leave equal overhang on the ends for balance.
5) Rafters and ties
Set 2×6 rafters 16 inches on center. Use hurricane ties at each seat (H2.5A or similar). A small 2×6 block at the top of each post can act as a lateral stop. Not pretty, but hidden—and strong.
6) The top: slats or panels
For open shade, run 2×2 purlins perpendicular to rafters, spaced 6–8 inches. For rain cover, add 1×4 purlins, then polycarbonate panels. Use manufacturer’s foam closures, leave expansion gaps, and fasten with screws that have EPDM washers. Overlap panels per the brand’s guide and face the ribs downslope. Don’t over-tighten; you’ll dimple the panel.
7) Anchoring to a slab (alternative)
No digging? If your slab is thick (at least 4 inches and in good shape), mount post bases with wedge anchors. It’s simpler, though stand-alone footings resist uplift better during a big gust.
8) Monsoon-proofing
Add diagonal 2×4 braces at the corners under the beams. It’s old-school, but it stops racking. Also, check every connector twice. When the first dust wall rolls in and your cover doesn’t flinch, you’ll be glad you did.
Finishes that beat UV, dust, and hard water
Lightly sand cut ends and roll on a high-quality exterior primer and paint, or a solid-color stain. Two coats. Light tans and off-whites stay cooler and match most stucco. Seal end grain—wood drinks there. For aluminum or steel accents, a quick wash and a coat of automotive spray wax helps dust slide off. Sounds fussy, works great.
Polycarbonate stays clear if you clean it with mild soap and a soft brush. Skip solvents and abrasive pads. Seal panel edges where they meet walls with outdoor-rated silicone. If you add a misting line, use scale-reducing nozzles or you’ll get chalky spots. Phoenix water is… assertive.
One small upgrade: a gutter at the low beam. It keeps splashback off pavers and your shoes. Not required, just neat.
Costs, tools, and a real-world weekend plan
Numbers help. A 10×12 freestanding wood cover with slats often lands around $900–$1,800, depending on lumber prices. Add polycarbonate panels and closures, and you’re closer to $1,500–$3,000. Pre-fab aluminum kits can run more, but they’re fast. DIY gives you size, look, and material control.
Tools you’ll actually use:
- Miter saw or circular saw with a sharp blade
- Post-hole digger or rental auger
- Level, tape, string line, and speed square
- Impact driver and drill (plus a hammer drill for anchors)
- Socket set, clamps, and a good ladder
- Safety gear: glasses, dust mask, gloves, ear protection
Timeline (be honest with yourself):
- Day 1: Layout, dig, pour footings
- Day 2: Set bases and posts, frame beams
- Day 3: Rafters, braces, top material
- Day 4: Finish and paint/stain (morning is cooler)
In peak heat, start early and hydrate. Concrete and people both behave better before noon.
Local add-ons that make it feel custom
Add a fan rated for outdoor use. Run it on a dedicated, code-compliant circuit with a weatherproof switch and box. If electrical work isn’t your comfort zone, that’s a quick call for a licensed electrician. Solar string lights rated for high heat are a fun touch and dodge wiring altogether.
Plant-wise, a couple of tall pots with Mexican feather grass or desert spoon soften the posts and give motion when the wind kicks up. Keep irrigation lines tidy and shielded from sun where possible—UV beats up exposed poly tubing.
For west walls, a slightly tighter purlin spacing or a darker shade fabric knocks down glare. For winter mornings, a slatted design lets in low-angle sun—nice with coffee when the air is crisp and the sky is that perfect Arizona blue. And on a July night, when rain hits hot concrete and you get that clean, earthy scent? Sitting under a cover you built yourself just feels different. Pride has a smell, too.
When to phone a pro (and how we can pitch in)
Honestly, there are moments when calling a pro is the right play. If you’re attaching to the house and need flashing through stucco, if your span jumps past 12 feet, if your HOA needs an engineered drawing, or if a city reviewer asks for uplift calcs—this is our everyday. Arizona Pergola Company builds for Valley weather, Valley codes, and Valley style. We’ll measure, design, permit if needed, and build something that looks tailor-made for your home.
Want help or a sanity check on your plan? Call us at 480-568-5870 or Request a Free Quote. We’re local, we’re friendly, and we love turning “too hot to sit” patios into all-day hangouts.